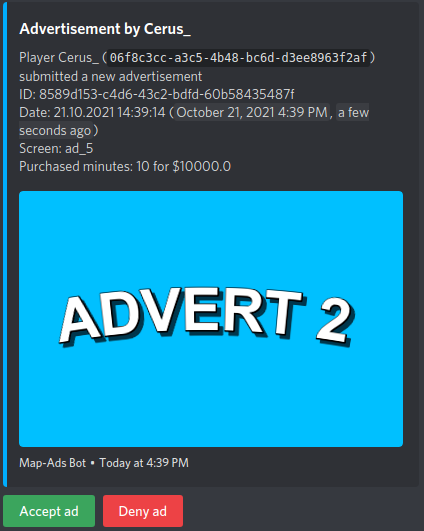
Discord integration
If you want to use the Map-Ads Discord integration you need to download the extension and drop the file into your plugins folder.
Staff members need the 'Manage messages' permission to accept/deny ads using the buttons.

Configuration
Default config (discord.yml):
enable & token
enable is a simple toggle for enabling or disabling the extension. The token field holds your Discord bot token.
Creating a Discord bot token
Visit https://discord.com/developers/applications and log in with your Discord account
Click 'new application'
Enter a name of your choice and click 'create'
On the left sidebar click 'Bot'
Click 'add bot' and confirm
(Optional) Change the picture and username
(Optional) Disable 'public bot'
Click 'reveal token', copy the token and paste it into the 'token' field in the discord.yml file
On the left sidebar click 'OAuth2'
Scroll down and select the 'bot' scope
Scroll down even further and select the permissions (At least 'View channels', 'Send messages', 'Manage messages', 'Read message history')
Copy the link above the permissions selector and enter it into your browser
Select the server and invite the bot
activity
This controls the bot appearance.
online-status: Either ONLINE, IDLE, DO_NOT_DISTURB or INVISIBLE
type: Either WATCHING, LISTENING or COMPETING
text: Text of your choice, will be displayed next to the type ("Watching the server")
time-format
Format for dates and time (used for the {{TIME}} placeholder)
See this page for an explanation on how the format works
message
Controls the appearance of the message. The image and thumbnail fields are optional and can be removed. color has to be specified using hex.
Placeholders:
{{PLAYER_NAME}} - Player name
{{PLAYER_ID}} - Player uuid
{{ADVERT_ID}} - Advertisement ID
{{TIME}} - Formatted ad creation according to the specified format
{{TIME_RAW}} - Ad creation time in seconds (can be used for Discord's time formatter)
{{SCREEN}} - Name of the ad screen
{{MINUTES}} - Purchased minutes
{{PRICE}} - Price paid
{{IMAGE_URL}} - Url of the submitted image
channel-ids
Enter the ID of every channel that should receive a message here. Example: channel-ids: [ "123456789", "123567864" ]
Check out this article if you don't know how to get your channel ids
Last updated